During your assessment, you will learn more about nourishing foods for healing & vibrant health
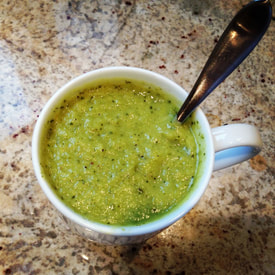
Green Alkalizing Soup
This alkalizing soup is very nourishing and is wonderful to have between meals, or as a starter for a lighter meal. You may substitute the listed green veggies here with whatever green veggie you may have. Taste is important. If you do not like the taste of a particular green veggie, don't use it! I personally like the below combination, and feel it is a very beneficial mix.
Ingredients:
Use roughly the same quantity of the following organic vegetables
-Green beans (ends trimmed and cut in small pieces)
-Zucchini (diced)
-Celery (chopped)
-leeks (white and tender green parts only - sliced)
-Broccoli (chopped)
Directions:
Steam or boil all vegetables except broccoli until just tender. Add broccoli and continue cooking until all vegetables are soft, but still very green. Drain most of the water from the vegetables and transfer to a blendar or food processor. Let cool slightly before blending. Add some bone broth, home made chicken broth, or warm filtered water and blend until smooth. Add butter or ghee, garlic powder, sea salt and pepper to taste. Additional herbs may be added if desired. Serve warm in 8oz mugs.

Pastured Eggs, Sunny Side Up
Eggs "Any Style"
Fresh eggs for breakfast are a wonderful way to start the day.
Good quality eggs are one of the most perfect foods because they contain just about every nutrient known on this planet and are especially high in the fat soluble vitamins A,E,D & K. Be sure your eggs come from a good source, not from chickens locked in cages, fed antibiotics, and without access to outdoor sunlight. Pastured eggs are best, but there are many other good quality eggs on the market.
Best way to cook eggs:
The yolks should have good color and when cracked onto a pan, should stand tall and firm. There should be a visibly firm thick inner white surrounding it, and a thinner outer white around it. Although eggs are good cooked any style, they are most nutritious when cooked "sunny side up" and the yolks are runny. Cook them in a safe, non-toxic pan and use plenty of good quality butter or ghee. I do not recommend eating eggs without the yolks (for example, as an "egg-white omelet") because the yolk contains all of the healthy fats, vitamins and minerals. I like to add one extra yolk when I make scrambled eggs. It adds lots of good color, more of the beneficial nutrients, and more of the wonderful yolk flavor!
What goes great along side your eggs:
-Plenty of good quality butter, some sea salt & black pepper
-Bacon. Real bacon!
-A side of fresh raw sauerkraut
-Butcher made sausage
-Fresh avocado
-Grated raw milk cheese
-Cooked mixed vegetables
-Fresh salsa
-A small green salad
Be creative... eggs go with just about anything. ENJOY!
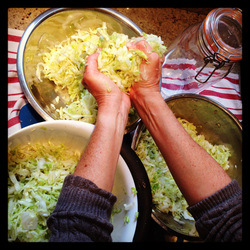
Raw Sauerkraut
This recipe ferments the cabbage in 5-day increments so you can ferment for shorter or longer periods of time to your liking. The longer it ferments, the more sour it tends to be. Experiment with different fermenting times to see what you like best.
Ingredients:
1 large head of organic green cabbage (about 3 pounds)
1 tablespoon coarse 'Celtic' sea salt or Kosher 'Real Salt'
Directions:
Wash the outside of the cabbage with cold water. Reserve and set aside a few large outer leaves. "Shred" the cabbage using a large sharp knife, making thin slices on an angle.
Combine the cabbage & salt in a large mixing bowl and let stand for 20 minutes. You may also add some caraway seeds if you like.
Massage the cabbage with clean hands for about 5 minutes to release the juices and form a briny liquid. Carefully pack the cabbage into 3 pint size canning jars or one very large canning jar. (I suggest using the ones with the rubber seal and metal clamp. I use one very large jar pictured here in the top right corner of the photo above.) Be sure the brine covers the cabbage by about 1 inch, leaving 1 to 2 inches of space at the top. Fold and push a reserved cabbage leaf onto each, filling the top space. The leaves do not need to be covered in brine and you may use several leaves if you need to fill more top space. Close each jar tightly and transfer to a glass baking dish or rimmed plate with 2-inch-high sides. Let stand in a cool dark place for 5 days. After 5 days, SLOWLY open and VERY QUICKLY close each jar to release the built-up pressure, being very careful not to let any brine bubble out. Let jars stand for 10 more days then open jars again to release the pressure if desired. Let stand for 6 more days, I like a VERY sour sauerkraut, so I ferment mine for 21 to 28 days!
NOTE: The room temperature needs to be between 64 and 70 degrees and should not fluctuate greatly. 68 to 70 degrees is optimal.

Almond Flour Muffins
Almond Flour Blueberry Muffins -Gluten Free
Adapted from Elaine Gottschall (SCD)
I adapted this recipe only slightly, and every person I've served these to has LOVED them - including children of all ages. They are wonderful, packed with protein, filling & healthy. You don't have to use blueberries - be creative. You can do a lot with this basic recipe!
Ingredients:
2 ½ cups almond flour (‘Bob’s Red Mill’ brand is best, or make your own!)
¼ cup melted butter OR ¼ cup plain whole milk yogurt (use melted ghee if avoiding dairy)
½ cup raw honey
½ teaspoon baking soda
½ teaspoon sea salt
3 whole organic eggs
1 rounded cup fresh blueberries washed and patted dry (use more or less to taste)
dash or two of vanilla extract (optional)
Directions:
Preheat oven to 375°F
Measure out the almond flour (packing it loosely in measuring cup) into a large mixing bowl. Using a blender or small food processor, mix together the eggs and honey until well blended. Add this egg mixture to the almond flour and blend by hand or electric beater. Add melted butter or yogurt to bring to a muffin batter consistency. Blend in baking soda and salt. Slowly fold in blueberries (with vanilla extract if desired) until just mixed. If the batter seems too thick, add more melted butter or yogurt.
If you wish, you may add both butter and yogurt together (to equal about 1/2 cup) for a nice rich & tangy muffin!
Line muffin tin cups with cupcake papers and fill each almost to the top. Bake for about 20 to 25 minutes, or until muffins are a deep golden brown.
NOTE: These muffins will be significantly more dense and not as big as standard muffins baked with regular flour. Also, you can experiment with many variations with this basic recipe, like using raisins or other dried fruit in place of fresh blueberries, or adding the juice of a fresh orange along with some orange rind for “orange muffins”, etc. I also often use both butter and yogurt in the recipe to add extra fat, moisture, and flavor.
If you are making your own almond flour, use organic whole almonds preferably unpasteurized. Grind them first (before measuring) using a blender or food processor until you reach a fine, flour-like consistency. Store any extra flour in the refrigerator.
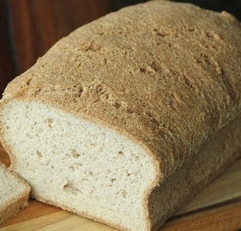 Basic Grain-Free Gluten-Free Bread
Gluten-Free & Grain-Free Bread/Cake/Muffin Recipe
from the G.A.P.S. book
This recipe is quite versatile for basic grain-free gluten-free baking. You can add various flavors with aromatics / herbs, extracts, honey, fresh or dried fruits, cheese, etc. It's important to note that this recipe produces a very different consistency compared to traditional breads, cakes and muffins. Be careful to not overcook.
Ingredients:
2 1/2 cups almond flour (finely ground raw, blanched, or sprouted almonds)
Note: you may use other nut flours, or a combination of ground nuts and seeds
1/4 cup softened butter (or coconut oil, duck fat, ghee, or home-made yogurt)
3 organic free-range eggs, slightly beaten
1 teaspoon sea salt
Directions:
Add all ingredients to a large mixing bowl and mix until well incorporated. Grease your baking pan using ghee, coconut oil, or other cooking fat and if desired, line the pan with greased baking paper to prevent the bread from sticking to the pan (for muffins, lightly grease the cupcake papers). Put the bread mixture into the lined pan or muffin tin and bake in a pre-heated oven at 300°F for about 1 hour. Check occasionally with a dry clean knife. If the knife comes out clean, the bread is ready. Let cool for at least 20 minutes before slicing. Store in the refrigerator, or freeze for later use.
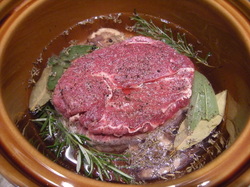
Easy Slow-Cook Pot Roast
Easy CrockPot Roast
by Ashley Hathaway, NTP, CGP
This is a great recipe to use when things are hectic and you are too busy to cook a meal from start to finish.
Directions:
Buy a pasture-raised roast of your choice (beef, pork, lamb) and put it in a CrockPot or other slow-cooker. Fill the slow-cooker with fresh filtered water about half-way up the sides, but not so much that it covers the meat. Add peppercorns, bay leaves, sea salt and fresh herbs of choice (rosemary, sage, thyme, etc.). It's also GREAT to add a couple of marrow or knuckle bones to the mix! If you are not leaving the house for awhile, turn the slow-cooker on HIGH until the water gets hot, then turn the temp down to the LOW setting. If you are not able to do this, set the temp to LOW as soon as it's all ready to go. Leave this to slow cook for 6 to 8 hours. You will then have a wonderful tender roast for dinner, and a large pot of beautiful beef broth to go along with it, or to save for later. If you are able to eat bread, this is wonderful with a loaf of warm sour dough and a simple green salad. It's also great served with sauerkraut and steamed veggies for a fast and nutritious meal! This recipes also works with a whole chicken or a lamb shank.
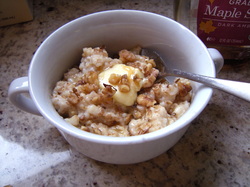
Warm Breakfast Porridge
Breakfast Porridge
from Nourishing Traditions by Sally Fallon
Besides pastured eggs & hot bone broth, this is my favorite breakfast. It is warm and hearty and just might change the way you feel about oatmeal!
(2 to 3 servings)
Ingredients:
1 cup organic gluten-free oats (Bob's Red Mill brand)
1 cup warm filtered water
2 Tablespoons raw vinegar (apple cider or coconut) or plain yogurt, whey, or kefir
Pure maple syrup, date sugar, or raw honey
1/2 teaspoon natural sea salt (Celtic sea salt is best)
Organic butter and choice of topping (see below)
Directions:
In a medium bowl mix oats in warm water adding the vinegar, yogurt, whey or kefir. Cover and leave in a warm place overnight and up to 24 hrs. When ready to prepare, add soaked oats to a medium sauce pan. Add some additional filtered water so the oats are completely covered. Add sea salt and cook over medium heat, stirring frequently for about 5 minutes. Turn heat off, add a little butter, cover and let stand for a few minutes. Serve in small bowls and add more butter or fresh cream, pure maple syrup, date sugar, or raw honey, then add topping of choice: crispy nuts (see recipe below), ground flax seeds, cinnamon, nutmeg, dried fruit, blueberries, banana, coconut milk, raisins, or currents. Choose what works best for you so that you really enjoy your porridge!
NOTE: soaked oats are easier to digest, more nutritious, and require much shorter cooking time than standard oats.

Crispy Walnuts
Crispy Nuts
from Nourishing Traditions by Sally Fallon
Ingredients:
4 cups raw nuts of choice (choose from walnut, pecan, almond, peanut, pine nut, or macadamia but NOT cashew - see note below)
1 Tablespoon natural sea salt (Celtic sea salt is best)
Fresh filtered water
Directions:
In a large bowl mix raw nuts with filtered water, some natural sea salt, then cover and leave in a warm place for 6 to 8 hours (or overnight). Drain the nuts through a colander then spread them out onto paper towels or clean kitchen towel to pat dry. Spread soaked nuts onto a large baking sheet (lined with parchment paper if you prefer) and place in a warm oven (no higher than 150 degrees) for 12 to 24 hours, tossing gently with a spatula a few times throughout. Store dried nuts in air-tight glass containers in the refrigerator. You may leave these nuts in an air-tight container at room temperature for about a week. NOTE: "raw" cashews require a slightly different process due to the fact that they are not exactly "raw" (even though they are as labeled "raw") Most of the enzymes in raw cashews have been destroyed during necessary processing, so you may dry them in a 200 to 250 degree oven for the same amount of time, however the soaking time must be limited to 6 hours. I think it's perfectly fine to eat organic raw cashews in moderation (no more than 1/4 cup) without doing this soaking process, but I do not recommend eating roasted cashews.
These soaked crispy nuts are easier to digest and far more nutritious than standard raw or roasted nuts. I do not recommend eating commercially roasted nuts. Contact me for more information on this!
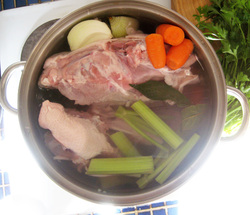
Chicken Bone Broth
Bone Broth (or soup stock) - classic technique
One of the best ways to get healing nutrients into the body is through the regular consumption of home-made bone broth. You may consume this nutrient-rich broth daily, or weekly for all the wonderful benefits during illness or in health.
A shorter simmered broth (typically called 'soup stock' and cooked for 2 to 4 hours) is more soothing for an upset stomach and gut inflammation than a long-simmered (18 to 24 hours) bone broth. A gentle soup stock is also very healing for colds and flu. For a nutrition boost, add a fresh organic egg yolk, Celtic sea salt, and a touch of raw grass-fed butter to your warm cup of broth or stock. This will aid in the assimilation of all the nutrients in the broth and give you a dose of vitamin K2 which is a critical nutrient for proper assimilation of calcium.
Directions:
Put 5 to 7 various bony meat parts in a large stockpot.
Choose one of these animal sources:
Chicken - backs, necks, wings, feet, head, and also giblets (but not the liver)
Beef - joints, ribs, knuckles, and marrow bones
Fish - whole fish, and or heads, backs, tails
Use fresh organic/free range/wild/pastured animal parts if possible.
Add the following vegetables roughly chopped:
2 to 3 large organic peeled carrots, 3 stalks organic celery, and one large organic yellow onion. (you may also add bay leaf, peppercorns, leek, fennel, herbs & fresh garlic).
Cover with cold filtered water and add 1 to 2 Tablespoons of raw apple cider vinegar (for example, Braggs brand). Let stand for 15 to 30 minutes. Adding raw vinegar helps pull the minerals from the bones!
Bring the broth to a hard boil, turn down the heat, then skim off any foam scum that rises to the top. Add an ample amount of Celtic or Himalayan sea salt (do not use regular table salt).
Turn heat down to a low simmer and cover with a tight-fitting lid. Cook for 18 to 24 hours to produce bone broth, and 2 to 4 hours for a gentle soup stock. Stir occasionally if possible and add more water if necessary. Be sure the water is MOVING & BUBBLING but not boiling throughout the cooking process.
Let broth cool to about room temperature (to accelerate this process, transfer the stock pot to a larger bowl or plugged-up sink and let it sit in a bath of ice water).
Strain the cooled broth into large mason jars or other glass containers. Refrigerate and freeze excess. Broth keeps about 1 week refrigerated, 3 to 4 months frozen. DO NOT remove the gel or fat that rises to the top once cooled. This material is highly beneficial and should be included with each serving of broth.
Note: DO NOT re-heat broth in a microwave oven! I believe microwaving is detrimental to the vitality of broth and other foods. It should be heated slowly on the stove top, or consumed at room temperature.
It has been noted in some research that microwave exposure may significantly reduce the nutritional value of food. Microwaves alter the elemental food substances & may cause digestive disorders. These chemical alterations to food may also cause lymphatic malfunctions. People regularly ingesting microwaved foods show a higher-than-normal percentage of cancer cells in their blood serum. Some research also suggests that certain trace minerals in plant substances that are microwaved form cancer-causing free radicals.